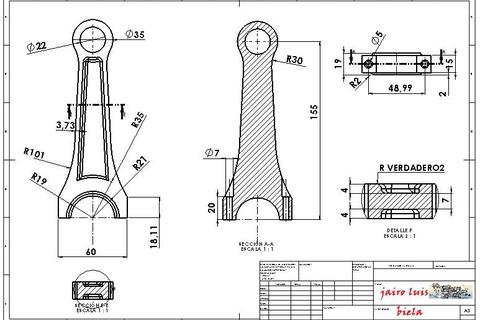
Helo friends. In this tutorial, you will learn How to How to Draw and Modeling Engine part 1 in Autocad. This is on categories advanced tutorial. You can learn tutorial step by step and more easly. so let us start. Fisrt you will see about part 1 engine you will draw. Here is it.

- Start Autocad, draw two circles like shown on the front plane
-
Step 2
add two tangent line
-
Step 3
add two more circle
-
Step 4
draw a line and mirror it
-
Step 5
draw a centerline and use trim command
-
Step 6
use fillet command like shown
-
Step 7
go up side and use trim command
-
Step 8
use fillet command again
-
Step 9
extrude the sketch in two directions. (5,5 mm for each way, total 11mm)
-
Step 10
open a sketch on the body and draw a line. make parallel the line with the shown edge
-
Step 11
mirror the line and add this two circle
-
Step 12
Intersect the lines and use trim command
-
Step 13
use trim command and mirror it
-
Step 14
draw two circles and cut the body
-
Step 15
draw two circles more and cut the body again. use offset feature
-
Step 16
draw a sketch on the body like shown
-
Step 17
extrude it 2mm and use mirror command
-
Step 18
now use fillet command
-
Step 19
your connecting rod is ready to use ( create a folder and save into it, firstly we will generate the V12 engine parts )
-
Step 20
from Luis :)
Now the tutorial How to Draw and Modeling Engine part 1 in Autocad has been finished. If you need any tutorial to improve your skill in autocad please visit other tutorial on this blog. Ok thanks for coming.
By Aykut Dana


Autocad Tutorial, E Book And Information Training: How To Draw And Modeling Engine Part 1 In Autocad: Advanced Tutorial >>>>> Download Now
ReplyDelete>>>>> Download Full
Autocad Tutorial, E Book And Information Training: How To Draw And Modeling Engine Part 1 In Autocad: Advanced Tutorial >>>>> Download LINK
>>>>> Download Now
Autocad Tutorial, E Book And Information Training: How To Draw And Modeling Engine Part 1 In Autocad: Advanced Tutorial >>>>> Download Full
>>>>> Download LINK li